At last week’s diabetes congress in Sydney, Accu-Chek announced that the tubeless Solo pump will be available in November once the government’s Prostheses List is next updated. The Prostheses List controls which pumps are available through private health insurance, and is only updated several times a year. I mentioned this in the ADC 2019 – Day 1 post, which has some more details about the pump.
For the last few days I’ve been wearing a dummy Solo pump just to get my head around the ergonomics. The dummy is the same size, shape, and weight as the actual pump, but is basically just a lump of plastic.
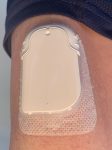
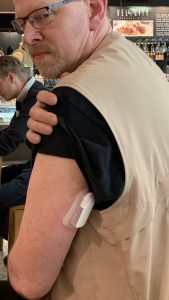 I fitted the infusion set to the back of my arm (opposite to my current Dexcom site) but obviously did not insert a cannula. This is a location I’m very comfortable fitting CGM sensors to, and using a mirror (or in this case a laptop webcam while sitting in a busy airport food court!) it was very easy.
As you can see in the photo I oriented the pump so that the reservoir was at the bottom when my arm is at rest. That’s the end that has the connection to the cannula, and if there are any bubbles in the reservoir this would keep them away from the cannula. But the product documentation also shows them oriented in other directions, so it shouldn’t matter on the whole.
I also located the pump so it wasn’t sticking out and away from my body. It was facing back and if anything rotated towards my body slightly. I have found this helps with my CGM sensors, including avoiding having them squashed while I sleep.
Overall I found the pump completely forgettable. And that’s a good thing! Most of the time I was not conscious of it being there. When pulling on a shirt or jumper, sure. But I’m used to that with CGMs anyway. It didn’t matter which side I slept on: the pump was a non-issue.
Not waterproof
 Because the pump uses a zinc-air battery (in order to fit enough power in) it has a small vent on the back which needs to be left uncovered. Otherwise the battery fades and the pump stops working. But as a result the pump cannot be waterproof. On the dummy pump you can see this as just a white depression.
 Thus you need to detach the pump for showers/baths/swimming, and reattach once you’re out. The infusion set remains attached to your skin in the meantime. This is similar to the traditional “tubed” pumps, just with less tubing and fuss to deal with.
Unfortunately the pump receded into the background of life so much that on two occasions I remembered I should have taken it off while I was already having my shower! The dummy pump didn’t care, but I wonder what would have happened to an actual pump.
Attaching the pump
Detaching the pump is a one-handed operation. There’s a small extension on the infusion set that when you push down (while pulling the pump up) unlocks the catch holding the pump in place. Re-attaching the pump is also one-handed, but does involve a slight complication.
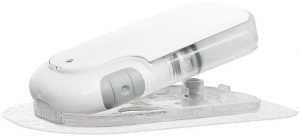 First hook the rounded end of the pump into the base plate, then push down on the other end of the pump until it clicks into place.
Sounds simple, right? However that end you’re pushing down on is the end that has the 6mm/9mm teflon cannula going into your skin. In my case that wasn’t there, but I know from experience that sometimes pressing down on 90˚ cannulae too much can be uncomfortable (especially depending what bits of your body have ended up next to the cannula).
I checked with people in the UK who are already using the pump, and there were mixed reports. Some people said this wasn’t an issue for them at all, while some people said that this was the most fraught aspect for them of using the Solo pump. Unfortunately if you hook a fingernail under the “unlock lever extension” (which is easy to access) and pull up against the pump it actually makes it harder to clip the pump in.
A solution
After a bit of experimentation I found where I could hook my thumbnail under the frame just near that, and push down on the pump with my fingers against that. The pump then clips in without much movement of the plate/cannula at all. It might be trickier if my thumbnails were too short though.
EDIT: I later found an even quicker attachment, which involves my thumbnail under the frame, a finger pressing down on the release/unlock lever, and another finger pressing down on the pump body. It sounds complicated, but worked easily without looking at it. I’m sure people will find their own optimal setup.
Now what?
Wearing the dummy pump has taught me a little about it, but there’s obviously a lot more to a pump than just a lump of plastic.
Now we wait to see and experience the real thing. Roll on November!
Disclosure
Obviously the dummy pump discussed here was provided by Roche. It was provided to me with no agreement or expectation that I would write anything about it. Roche did not know I was writing anything until I’d already published it.
I wonder if the pharmaceutical companies are aware of how difficult using their products can be with peripheral neuropathy (a T1D complication I live with daily). I find attaching and detaching the tubing for Medtronic pump difficult when I can see it but the back of my arm might be impossible.
Doesn’t have to be the back of your arm. That’s just the location I chose because it’s out of the way for me.
Firstly David. Thankyou for this article. I can’t wait to get my hands on this device and I have found all your articles very informative.
Im onto my 4th Medtronic pump since 2000…and I am ready for a change. I will miss the smart guard from my 670…but I am sick to death of this lump hanging off my knickers etc.
I have registered my interest via the accu chek webpage…so I will wait and see what happens.
Thank you for the article. By any chance will the pump talk to a phone or do you need to still carry the pump computer device thing
Currently it will only talk to its dedicated controller, sorry.