The Dexcom G6 CGM system is relatively flexible, although many people don’t understand how it works. But a little knowledge goes a long way.

The basics are an obvious start. We have:
- a sensor we insert into our skin,
- a transmitter we place in the sensor, and
- an application that talks to the transmitter via Bluetooth.
I’ll explore some of the use of the system (from the point of view of how the technical details affect how we have to use it). I’ll finish with the example of how we can do things like move a running sensor session between phones.
Waking a transmitter
If this is the first sensor this transmitter has been in, it wakes from factory hibernation and prepares to pair with something via Bluetooth. If the transmitter is already out of hibernation it will wake up every 5 minutes.
 It’s actually possible to fool a transmitter into waking up from hibernation to pair without using a sensor, just by holding your finger on the sensor contacts for long enough. Of course you should clean the contacts (e.g. with an alcohol wipe) before inserting into an actual sensor.
Once a transmitter has been activated, it starts a timer going. Once it gets to 100 days it will refuse to start new sensor sessions (Dexcom’s assumption is that some batteries will start to fail some time after that, and customer support is much easier if they avoid that). The Anubis G6 transmitters use larger batteries, and their timer can max out at 180 days.
Once the limit has been reached, no new sensor sessions can be started. The standard Dexcom G6 needs to be replaced entirely, but the Anubis G6 can be reset (using the same Bluetooth commands that worked on G5 and on early G6 revisions) at which point the transmitter goes back into hibernation with the day counter set to 0. Alternately, replacing an Anubis’ battery automatically causes a reset.
Bluetooth pairing
Usually a G6 transmitter is only paired with one device (e.g. a phone). But it can maintain pairing with up to two devices. They’re separated into “slots”.
Slot 2 is for “phone” applications. Examples include:
- Dexcom G6 Mobile
- CamAPS FX
- xDrip+
- xDrip4iOS
Slot 1 is for “medical devices” or “receivers”. Examples of this are:
- Standalone Dexcom G6 Receiver
- Tandem t:slim X2 insulin pump
- BlueJay smartwatches
- xDrip+ (if the slot number is reconfigured in engineering mode)
The transmitter allocates a host device’s Bluetooth address to a slot, and it will communicate with both devices (if configured) every 5 minutes. Probably the most common scenario where people use two slots is where they use a Tandem pump (on slot 1) and the Dexcom phone app (on slot 2).
Many people use only one host application, but the facility for 2 devices is there. Actually Anubis G6 transmitters have three slots.
So the G6 can talk to a phone app AND to a t:slim pump at the same time, but not to two apps (with the exception of xDrip+ in special configuration).
Do note that there’s no point in having both slots pointing to the same phone. The slot doesn’t associate traffic with a particular app: just a particular host device. And if two apps on the same phone are trying to talk to the same transmitter they’ll just compete for the chance to see something every 5 minutes.
Sensor sessions
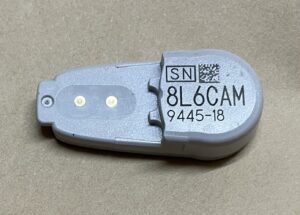
 An application (from either slot) can send a “Start Sensor” command to the transmitter. This command effectively includes a 4-digit sensor code (found printed on each sensor’s paper cover) which is used by the transmitter in managing “auto-calibration”.
The command doesn’t actually include that code verbatim, but rather some constants derived from it. But that’s a detail that most people don’t need to know.
The transmitter must be connected to an actual sensor when it receives the Start Sensor command. If no sensor session is already running, the transmitter begins warming up the sensor using that code, and eventually starts returning glucose data. In the standard G6 transmitter the warmup period is 120 minutes (it was shorter in the Dexcom G6+).
If a sensor session is already running (e.g. it was started from the other host device) then the sensor code is ignored, and the transmitter immediately starts returning glucose data. In fact, most applications will immediately fill in the last 3 hours of glucose data!
Applications tend to have a “skip” or “no code” option, which can be regarded as using the sensor code 0000. If the sensor session is already running then this is fine. However if you use this option to start a session from scratch, the transmitter will disable auto-calibration (see below) and repeatedly ask you for calibration fingerpricks (similar to the G5).
Similarly, a host application can send a “Stop Sensor” command (after you initiate this on your device, it should get sent to the transmitter within the next 5 minutes when the transmitter wakes up). When the transmitter’s sensor session ends, this will affect all applications talking to the transmitter.
The standard G6 transmitter will auto-terminate a session after 10 days (incidentally, the G6+ was 14 days).
Calibrations
The G6 is designed to “auto-calibrate” and not require regular blood sacrifices to calibrate it. This is partly because poor calibration technique has probably been the largest source of inaccuracy for CGM systems.
However sometimes the system does benefit from a manual calibration. An example that springs to mind is if you’ve started a sensor session a long time after the sensor was inserted. Usually in that case the system ends up returning artificially-high numbers, but a single well-placed calibration can bring it back into line.
The calibrations are maintained within the transmitter for that sensor: calibrating from one host application will affect the data seen on both slots (although it may take 5 minutes for the change to be noticed).
Giving it a calibration once doesn’t mean you will need to keep calibrating it. And in general it’s best not to:
Remember calibrations are a big source of errors!
That 5-minute cycle
After the transmitter has finished talking to a host device (or given up because the host for that slot didn’t respond) the transmitter puts itself to sleep for almost 5 minutes to save battery. After that it wakes up, measures the sensor glucose, and then tries to talk to its host devices again (or accept a new pairing).
Some applications report BG values plus with the number of minutes since the last number: you would expect that to roll back to 0 every 5 minutes (unless you walk away from your phone at the wrong point). I sometimes wish all apps did this: it’s very useful to know how old that BG number is.
It’s worth keeping this 5-minute delay in mind. For example if you start a sensor via your phone, it might be 4 minutes before the transmitter actually receives the Start Sensor command and starts the warmup. Eventually when the phone says the warmup is over, it could then be another 4-9 minutes before you actually see data.
Swapping between phones
Here’s an example where the 5-minute delay can actually be useful. Essential in fact! Occasionally we may want to transfer from one phone to another. Using the above information, we don’t have to start a new sensor to do this!
One example may be when swapping from the Dexcom G6 Mobile app on an iPhone, over to CamAPS FX on an Android phone.
Both devices will be wanting to use the same slot, so we have to stop one before connecting the other. But the trick is to not tell the transmitter to Stop Sensor.
We could tell the Dexcom app to instead talk to a different transmitter (e.g. the imaginary “800000”) but it won’t let us pair a new transmitter without first stopping the sensor. But we don’t want the transmitter to stop the sensor session!
One solution might be to simply uninstall the Dexcom app. But that’s a bit heavy-handed.
We can try an alternate method, but we need to do things in order, and at particular times. Of course, this is assuming you have a sensor session running, not about to expire while you’re doing this.
The recipe
On the old phone:
- Wait (up to 5 minutes) for the BG number to update. Shortly after the transmitter will put itself to sleep for 5 minutes.
- Stop the sensor. The application will queue up the Stop Sensor command to be sent on the next connection.
- Immediately select a new transmitter (e.g. “800000”). This will cause it to drop the Stop Sensor command that was queued up for the old transmitter.
- Go to the phone’s Bluetooth device list, and Forget/Un-pair the transmitter’s DexcomZZ device.
Then on the new phone:
- Tell the new app to connect to the transmitter’s ID.
If the app does this as part of starting a sensor (some ask for the sensor details before the transmitter ID) that’s OK.
Remember to accept the pairing prompt which is eventually brought up by your phone’s operating system. - “Start” the sensor.
It will ask you for the sensor code. However if a session is already running the transmitter will end up ignoring the code, so you can select “No-Code” or “Skip”.
Once the system pairs with the transmitter and sends the Start Sensor command, the transmitter won’t restart the sensor session but it can automatically download the last 3 hours of data. It should suddenly spark into life: there is no warmup period!
If you’d been too slow between steps 2 and 3 above, the Stop Sensor command may have been sent to the transmitter. At which point a standard Dexcom transmitter will refuse to restart the sensor, and the exercise was a bit of a waste of effort. Step 1 is in there to give you as much time as possible to get through the next steps.
It’s that easy
That’s about it. The same technique can be used if you’re swapping between one application and another on the same phone. Just remember that only one app on the phone can talk to the same transmitter at a time.
Nice work. Great post.
Thank you for putting this all together! Why is step 2 (stop) needed, if it won’t be sended?
Because the software typically won’t let you do Step 3 without having done Step 2 first.
Top stuff, as always. Thank you so much.
Great article & research as always. One doubt: what setting in xdrip to change slot#1 for xdrip plus? Found only “BlueJay uses Phone slot(#2)” but that seems opposite use
In the G5/G6 Debug Settings there’s a Manual Slot Number setting.
Why does the Anubis G6 have 3 slots and what does this allow?
I guess it was easy to add, and then they’d see how it got used.
3 slots would (if software used it) for example allow direct-to-watch CGM on separate slot without affecting a phone or receiver connection.
I use it in my own setup, with slot 2 connected to my iPhone, and slot 1 connected to xDrip+ on my loop controller (an Android phone). But when I’m transferring operations to a different device (I chop and change a bit) I can get the CGM running on the new phone on slot 3 without disrupting my active loop that’s using the same G6 sensor, and then when I’m ready transfer the pump connection over to the new phone. It so much less stressful than interrupting the CGM link. Then on my next change I would transfer back to slot 1.
Tried the process to switch cell phones connected to the G6 transmitter and it failed. Lost time, and further use of the sensor. Not a cheap failure.
Everything comes with a risk.
But as long as you don’t let anything send a Stop Sensor command to the transmitter (as mentioned in the article) you should be good.
If the transmitter does receive that command, yes a standard Dexcom G6 will then refuse to let you use that sensor (unless you go through the disconnect-wait20min-reconnect dance).
Hello, I’m about to try your method on switching between phones. Please could you describe why step 2 and 3 required? What would be different if I just disabled Bluetooth on the old device and tried to pair on the new device?
I have tried this so far, but it wouldn’t pair after 10 minutes (and I don’t want to go a long time without readings). I’d rather not lose this sensor since it’s only 1 day old, so I’m trying to not take any chances.
Thank you for this article.
The reason I suggest those steps is that you get it out of the way and then the old phone will have released the transmitter and not at risk of interfering later when Bluetooth gets turned on again.
With the timing right you can then be confident the sensor session is still safely running on the transmitter, and whenever you connect to it from whatever phone it will pick that up without “restart”/etc issues.
If a phone is not pairing with a Dexcom then I’d be checking a few things:
IT WORKED!!!!!! Thank you 🙂
How do I move between two Tslim insulin pumps and reconnect to the Dexcom transmitter? I’ve just got my new in-warranty pump and have stopped the sensor on the old pump, put the pump into storage mode and then put the transmitter ID into my new pump, but it won’t connect. Presumably the transmitter is trying to maintain a bluetooth connection to the old pump? However, there’s no way I can tell the transmitter to forget the old pump…
Actually, my new pump just started picking up the readings from the old transmitter so I guess it was just a matter of being patient!
Hi mate, can you do this if going from android and camAPS back to an iPhone. What are the details for this? Or just do it in reverse? ?
Same basic procedure.
Get CamAPS and the Android phone to stop talking to the transmitter (forgetting the DexcomZZ device in Android’s Bluetooth settings would be a good start). If you have to “Stop sensor” I’d do it during the 5-minute gap where the transmitter is sleeping, and make sure the command queue is flushed before it gets a chance to be sent.
Then just “start” on the iPhone as normal.