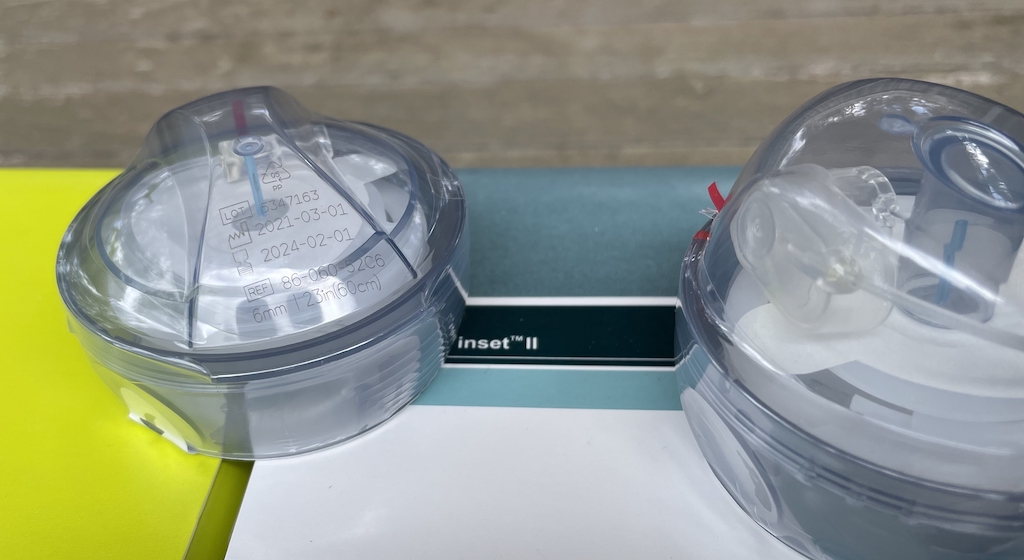
The Animas Inset II infusion set was the one I started my pumping with (on an Animas 2020). It’s been a very reliable performer for me over the years. The same infusion set is available under various brands with a variety of pump connectors. In Australia we have seen:
- Animas Inset II (Animas pumps and Accu-Chek Combo)
- Medtronic Mio (Medtronic pumps)
- YpsoPump Inset (YpsoPump)
- Tandem AutoSoft 90 (t:slim)
- DANA Inset II (DANA R/RS/i)
They’re all available through NDSS, and are all made by the same manufacturer (Unomedical). The domes on the Mio and YpsoPump Inset are a different (lop-sided) shape, but that’s just to accomodate the larger pump connectors.
I’ve used many other sets over the years, but the Inset II style has remained a personal favourite. They come with a self-contained inserter (with only a tiny “sharps” component and most of it is recyclable plastic), can be inserted one-handed in otherwise-awkward-to-reach locations, sit fairly flat to the skin surface, and as long as you have mastered the insertion technique they have been very reliable for me.
Then the Inset II went away
 As an Accu-Chek Combo user I was sad in 2019 when the Animas Inset II was finally taken off the market. I wrote about it when my stash dried up in 2020.
The Combo remains a popular pump due to its ability to to be used in closed-loop setups and to accept a variety of infusion sets. Compatible sets available through NDSS include: Accu-Chek FlexLink/TenderLink/Rapid-D, Medtronic Silhouette/Quick-Set/Sure-T, Cleo 90, Ypsomed Orbit micro/soft. However the lack of the Inset II is a negative for some people.
When I’m using an YpsoPump the Inset has become my go-to set, but when using the Combo for some time I’ve had to use other sites. The Medtronic Quick-Sets (in luer-lock form) have been fairly reliable. But not quite the same. And those benefit from their dedicated inserter.
A new option for a Combo user
I recently realised that I can still use Insets with my Combo pump! A recent addition to the NDSS list has opened up an option. I’ve done some experiments recently and it’s turned out to be very reliable. I’ll show what’s worked for me, but it’s all very unofficial and “not supported” so it’s up to you as to whether this information is useful.
It starts with the knowledge that all the above sets are effectively identical except for the pump connector.
Not always replacing the tubing
In my earlier article about filling cannulae I described how on the Combo I usually use a new site/tubing with each new pump reservoir, but as the 315U reservoir can last me 10-12 days (with no apparent drop in insulin effectiveness) I still change infusion site after each 3 days.
Without connecting the new tubing to the pump or pre-filling it with insulin, I insert the new site and immediately remove and discard the new tubing. Then disconnect the tubing from the old site, move it to the new site, and proceed to fill the cannula.
In this way I stretched out my stash of Animas Inset II by only using one (and its tubing) for the first site of a reservoir, and using readily-available Medtronic/YpsoPump/Tandem sites for the subsequent sites. I’ve done similar mix-n-match using Medtronic and YpsoPump pumps when using up sites.
Only changing the tubing at the same time as the reservoir also means I’m not wasting insulin filling a new line. Not disconnecting the tubing from the pump means no air gets in and I don’t have to flush new bubbles out.
Fill volumes
Because the site wasn’t pre-filled before insertion, I’ve found I need to increase the usual fill volume by 0.2 U. This amount applies to this site type only: the requirements of other cannula types are described in that earlier article.
Interestingly, the fill volume for a 6mm Medtronic Mio was described as 0.3U (9mm as 0.5U). But the fill volume for the 6mm YpsoPump Inset and DANA Inset II are specified as 0.1U (9mm as 0.2U). It seems Unomedical revised their advice somewhere along the way.
Even when using 6mm Mio and Animas sites I changed my fill volume to 0.1U some time back and have noticed no under-dosing. So that’s 0.3U for a site-only insertion (not having prefilled the line which we just discard) due to the extra 0.2U.
DANA Inset II to the rescue
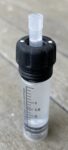
 The DANA connector is essentially a luer-lock but with the screw direction reversed. Left-to-tighten instead of right. They’re otherwise the same. With a little modification they can be made to fit the Combo. Incidentally for a long time some people have been modifying standard luer connections to fit their DANA pumps. It turns out the reverse works too.
Keep in mind that this operation is only needed for the first site of a reservoir. When I’m sitting down to refill the pump is when I do this. 3 days later when changing only the site, I’ve never needed to touch the pump at all. I have a box of DANA sites I can use for 10 reservoirs (close to 100 days for me) and several boxes of YpsoPump Insets that I use for the intermediate sites. Whatever mixture works.
Of course, my total daily dose (TDD) is only in the 30s. If the TDD was closer to 100 U, then after 3 days I’d be ready for a new reservoir at the same time and this would be less convenient.
First, a re-cap
 The standard procedure for a Combo fill is to fill a reservoir, place the protector cap over the reservoir tip, then push the black cap onto it. Then remove the protector and screw the luer connector in.It engages the thread in the black cap, and pushes down onto the reservoir tip.

Then hold the reservoir beside the pump (with the cap lined up) so you can advance the pump piston to the right level so when you insert the reservoir it screws onto the piston at the same time the cap screws into the pump body. We need to change the first part of that process slightly, which I’ll outline later.
But first, once the sterile Inset II is unwrapped, the DANA connector needs modification and then immediate fitting to the reservoir to keep the inside of the connector and tubing sterile. I’ve done this modification with a sharp craft knife, being careful to not go anywhere near the inside of the connector (which will touch insulin). Both sides of the connector need modification, and I practiced with a spare and an old pump cap long before I actually used this on a real connection.

I just had to trim the end of the “thread” slightly (away from the end of the connector). While theoretically not providing as much surface contact between the connector thread and the cap surface, I’ve found it grips very well.
Cleaning the caps
Note that I usually alternate two pump caps on my Combo. I use one on the new reservoir, and after the changeover I remove the cap off the old reservoir before discarding the reservoir/tubing. That pump cap then goes into the kit (with spare battery, etc) I’ll use when filling the next reservoir. The thread of the cap can collect dust and fluff from your clothes, and I clean it out before re-use. A stiff “pipe-cleaner” type brush is very useful for this as I can screw it in and out to clean the threads.
 Also note that the Combo manual recommends that we change both the reservoir and battery caps every 2 months. For people with in-warranty pumps Accu-Chek supplies free Service Packs including these (and a battery/luer tool). At the moment they send me two service packs at a time, so I have a standing 4-monthly appointment in my calendar to ring up and request new ones. They also sell these kits to people without warranty. The standard Service Pack also contains four AA alkaline batteries: the “Service Pack Small” is just the important bits.
Replacing the battery cap ensures the electrical connections remain solid, but also replaces the O-ring for waterproofing. The reservoir cap has waterproof pressure relief valves in it (to avoid pressure imbalances between the outside and the reservoir compartment) so should be replaced eventually. I do usually replace them after longer than 2 months, but then my pump is not living in a dust bowl where those valves might get obscured.
Changing the order
After modifying the DANA connector I can screw it into the Combo cap, but it can take a bit of “jiggling” to get the threads lined up. This is easier without the tip of the reservoir pointing through the cap. So I now screw the connector into the cap first. All the way so you can see from underneath that it’s flush.


Then I push the reservoir up into the cap (obviously with the protector cap removed). After pushing it up (and having the reservoir gripped by the sides of the cap) it sits fairly securely. But I keep pushing while twisting the reservoir (gripping the DANA connector instead of the cap with my other hand) so that it mates just that little bit more securely.
At that point I continue with the usual process: holding the reservoir beside the pump so I can advance the piston to the right level.
Reliability and long-term use
This is obviously outside the design of the system, so there’s no guarantee that it will work as designed. But I have found it to be solid and secure. There may be a smaller contact area between the connector and cap threads, but it seems locked in securely. It hasn’t budged even in a week of the pump bouncing around in a pocket.
The altered DANA thread is going to impose different wear on the Combo cap than a standard luer connector. But so far I have not noticed any issues on visual inspection. And as discussed earlier, the caps get replaced after a while anyway.
There is one thing with this setup which may become an issue once we’re able to travel freely once again. That’s the need for a very sharp knife in the toolkit to be used when changing reservoir. Taking knives on aircraft can be a problem, and checked luggage might not be available when I need it.
 But I’m very glad to have access to the Inset option again! Now I can use the same sets on my backup pump as on my main pump.
There are currently three versions of the DANA Inset II available through NDSS. So I have a choice of 60cm and 80cm tubing.
Being fair
Of course, we Combo users shouldn’t buy up all the DANA sets we can find: think of the DANA pump users who are relying on these stocks.
One box of 10 will last me a long time (~100 days of continuous use) because I use Ypsomed/Medtronic/Tandem sites for everything except when I need new tubing.